
👉 The GitHub Repo
👉 The YouTube Video
Intro
This modern day record player lets you wave an album cover ontop of the wooden box, and automatically starts playing the album!!
The record player uses Radio-frequency identification (RFID), the same technology in your credit card when you tap to pay, and in access cards you scan to enter restricted buildings. This technology usually involves RFID chips such as in your credit card, and an RFID scanner such as a debit machine that can read the values of the card when it is tapped and perform an action accordingly.
In this project, the RFID scanner module is mounted inside the wooden box, and the vinyls all have an RFID sticker that can be tapped on the box to switch the album. Inside the box, the RFID scanner is wired to a Raspberry Pi, which is running a python program that switches the song based on the value it reads from the RFID scanner. Depending on the RFID sticker value, the corresponding album is played through the Spotify API.
In this blog post, I'll be teaching you everything you need to make this record player. You can also watch the YouTube video if you prefer.
Table of Contents
- Wiring the RFID Scanner to the Rapsberry Pi
- Setting up the Raspberry Pi
- Using Python to Read RFID Sticker Values
Bill of Materials
I get a small commission if you use the links below to purchase the items for this project <3
- RFID RC522 Module with Soldered on Header Pins 🇺🇸 USA 🇨🇦 Canada
- RFID Stickers (13.56MHz) 🇺🇸 USA 🇨🇦 Canada
- Raspberry Pi 4 🇺🇸 USA 🇨🇦 Canada
- Raspberry Pi 4 Power Supply 🇺🇸 USA 🇨🇦 Canada
- Female to Female Dupont Jumper Wires 🇺🇸 USA 🇨🇦 Canada
- Speakers
RFID Scanning
Wiring the RFID Scanner to the Raspberry Pi
When you purchase the RFID scanner, it should come with a set of header pins. The header pins are either pre-soldered on, or included for you to solder them on yourself. Either way, your RFID module needs to have headers to connect it to the Raspberry Pi.
To wire the RFID Scanner to the Raspberry Pi 4, we will using female to female dupont cables. Using the following wiring specifications, connect the RFID Scanner to the Raspberry Pi.
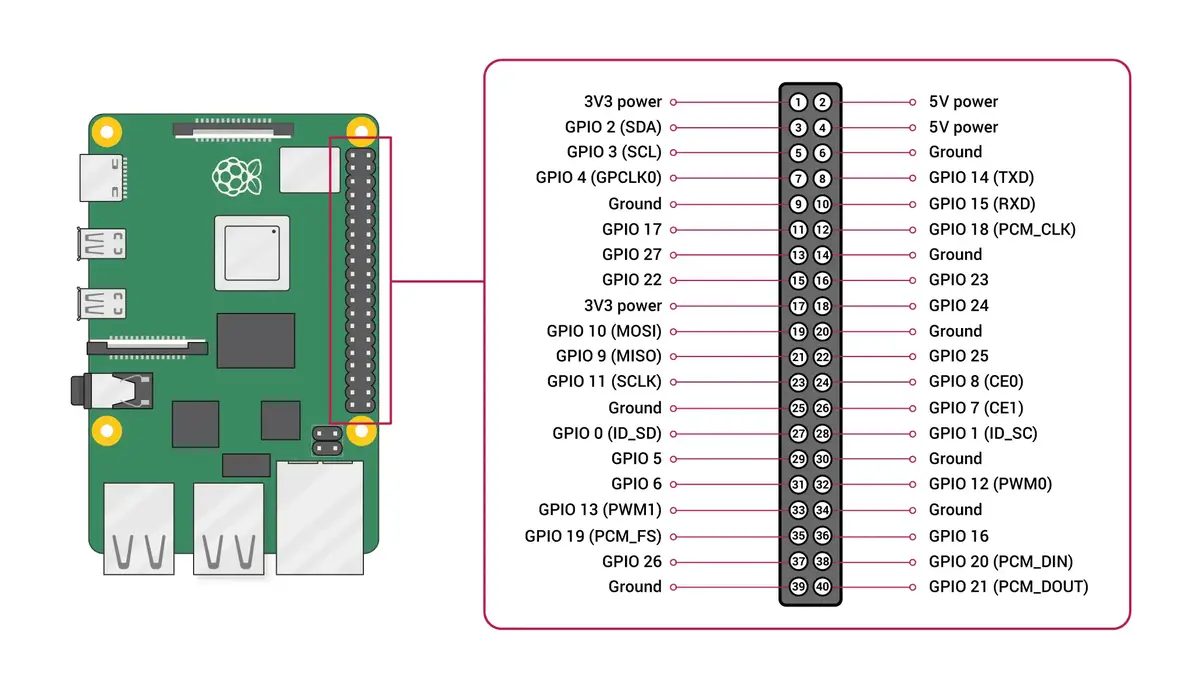
- SDA pin (on RFID module) connects to GPIO8 pin (on Raspberry Pi)
- SCK pin (on RFID module) connects to GPIO11 pin (on Raspberry Pi)
- MOSI pin (on RFID module) connects to GPIO10 pin (on Raspberry Pi)
- MISO pin (on RFID module) connects to GPIO9 pin (on Raspberry Pi)
- IRQ pin (on RFID module) is not used
- GND pin (on RFID module) connects to GND pin (on Raspberry Pi)
- RST pin (on RFID module) connects to GPIO23 pin (on Raspberry Pi)
- 3.3v pin (on RFID module) connects to 3v3 Power pin (on Raspberry Pi)
This diagram will help you determine where the GPIO pins are on the Raspberry Pi
Setting up the Raspberry Pi
Now that our wiring is done, we can turn on the Rapberry Pi and set it up. The first thing we have to do is update our Raspberry Pi to the latest operating system, and ensure it is running the latest software.
-
Turn on your Raspberry Pi
-
Open a terminal window
-
To update your Pi and ensure it is running the latest software, type the following commands:
sudo apt-get updatesudo apt-get upgrade
Next, in order to be able to use the RFID module with the Raspberry Pi, we have to enable SPI in the Raspberry Pi's config options.
-
Open a terminal window
-
Type the following command
sudo raspi-config -
In the window that pops up, select "Interfacing Options"
-
Select "SPI"
-
Select "Yes" to enable the SPI Interface
-
Wait until you see "The SPI interface has been enabled"
-
Restart your Raspberry Pi, by typing this command in terminal
sudo reboot
Using Python to read RFID sticker values
Now that we have setup our Raspberry Pi, we have to install some packages/libraries before we can use Python to read RFID tags.
Install the required packages/libraries by typing the following commands into terminal:
sudo apt-get install python3-dev python3-pip
sudo pip3 install spidev
sudo pip3 install mfrc522
Now we can start interacting with the RFID scanner.
- Create a new folder in your Documents folder and call it "rfidspotify"
- In the folder, create a file and call it "read.py"
- Right click on the read.py file, and click on "Open with Thonny"
Thonny is a Python IDE that comes pre-installed on your Raspberry Pi, and lets you write and run Python code.
Once you have read.py open in Thonny, copy and paste the following code into the file. This code will wait until you scan an RFID card/sticker over the RFID scanner, and prints the value of the card.
read.py
| #!/usr/bin/env python | |
| import RPi.GPIO as GPIO | |
| from mfrc522 import SimpleMFRC522 | |
| reader = SimpleMFRC522() | |
| try: | |
| print("Waiting for you to scan an RFID sticker/card") | |
| id = reader.read()[0] | |
| print("The ID for this card is:", id) | |
| finally: | |
| GPIO.cleanup() | |
Using this file:
- Click the green play button in the Thonny toolbar to run this file.
- In the shell, you should see the message "Waiting for you to scan an RFID sticker/card".
- Scan an RFID sticker on your RFID scanner.
- When the scanner reads the code, the shell should say "The ID for this card is: " followed by the ID scanned.
You will be using this file to scan your RFID cards and get their values to associate them with different Spotify albums/songs in the next section.
Spotify Integration
Making the Raspberry Pi a Spotify Connect Device
The first thing we need to do to integrate Spotify with the Pi is making it a Spotify Connect Device. This adds the Raspberry Pi to your list of available Spotify devices on your home network, and lets you play Spotify tracks through it.
We'll be using a library called Raspotify which does all of this for us!
-
In your Raspberry Pi, open a terminal window and paste the following:
curl -sL https://dtcooper.github.io/raspotify/install.sh | sh -
Wait for it to finish installing
-
Open Spotify on PC/Mac/phone and click on the Spotify Connect icon
-
You should be able to see "Raspotify" as one of the available devices! Click on it
-
Connect speakers to the Raspberry Pi
-
Play a track, and it should play through the speakers connected to the the Raspberry Pi!
Spotify API Setup
So at this point, we have code that allows us to scan and read RFID stickers, and we are able to play Spotify through our Raspberry Pi. The last piece of the puzzle is using the Spotify API to control the music that plays on the Raspberry Pi based on the RFID card values.
Since the program we wrote earlier to read RFID stickers is in Python, we will use a library called Spotipy that lets us access the Spotify Web API through Python.
But first, we have to do some quick setup to get some tokens from Spotify that will allow us to access their API.
-
Navigate to https://developer.spotify.com/dashboard
-
Sign in with your Spotify Premium Account
-
Click "Create an App"
-
Click on your app
-
Click on "Edit Settings"
-
Add the following callback URIs
http://localhost:8888/callback http://localhost:8080 -
From the dashboard, note down the Client ID and Client Secret, because we will need those in a later step.
Now we have to find the device ID of your Raspberry Pi. Since we made it a Spotify connect device, it will have its own device ID.
- On your phone/computer, open Spotify and connect to "Raspotify" from the available devices. We need it to be an active device in order to find its ID
- Navigate to https://developer.spotify.com/console/get-users-available-devices/
- Click get token
- Check all the boxes under "Required Scopes for this endpoint"
- Click "Request Token"
- Underneath the Get token option, click "Try It" to make an API call and get the list of Spotify devices on your home network
- In the json response, find the ID for the Raspotify (Raspberry Pi) device
- Jot down this Device ID
Before continuing, make sure you have these 3 things jotted down:
- Client ID
- Client Secret
- Device ID
Using Python to Control Spotify
Next, we will install the Spotipy library, which will let us access the Spotify Web API using python.
sudo pip install spotipy
Once that installs, we can start writing our first python program to control Spotify on Raspberry Pi.
- In your "rfidspotify" folder, create a file called spotifyTest.py
- Copy and paste the code below
- Change the Device ID, Client ID, and Client Secret in lines 6-8 with your own values that you jotted down.
- Run the program
- You will get redirected to a Spotify webpage where you have to agree/accept to authentication. Click agree
- Once you click agree, a song will automatically start playing through the Pi
If you get a no device found error, open Spotify on your phone/computer and connect to "Raspotify" from the available devices and try it again. We need it to be an active device in order to play songs through the API, otherwise the API call will fail. You usually only have to do this again if you haven't played anything on the device for a few hours. However, as long as you're playing music on it, it will remain active.
spotifyTest.py
| #!/usr/bin/env python | |
| import spotipy | |
| from spotipy.oauth2 import SpotifyOAuth | |
| from time import sleep | |
| DEVICE_ID="YOUR_DEVICE_ID" | |
| CLIENT_ID="YOUR_CLIENT_ID" | |
| CLIENT_SECRET="YOUR_CLIENT_SECRET" | |
| # Spotify Authentication | |
| sp = spotipy.Spotify(auth_manager=SpotifyOAuth(client_id=CLIENT_ID, | |
| client_secret=CLIENT_SECRET, | |
| redirect_uri="http://localhost:8080", | |
| scope="user-read-playback-state,user-modify-playback-state")) | |
| # Transfer playback to the Raspberry Pi if music is playing on a different device | |
| sp.transfer_playback(device_id=DEVICE_ID, force_play=False) | |
| # Play the spotify track at URI with ID 45vW6Apg3QwawKzBi03rgD (you can swap this for a diff song ID below) | |
| sp.start_playback(device_id=DEVICE_ID, uris=['spotify:track:45vW6Apg3QwawKzBi03rgD']) |
You will notice on line 21 that the song playing has the URI "45vW6Apg3QwawKzBi03rgD". Try changing this up to a URI of a song you like, and run the program again. To get the URI of a song:
- Find the song on Spotify Mac/Windows/Phone
- Click the option to share the song, and copy the song link
- The song's URI is the code after "track/" and before "?si=". So in this link, it would be the highlighted text:
https://open.spotify.com/track/4hTErxf8ZqFNGH0hZqEoAI?si=b8af6025f06a4ee4
You can also play an album this way, but you have to change the parameters in the start_playback() function to use context_uri= instead of uris= like this:
sp.start_playback(device_id="", context_uri='spotify:album:0JGOiO34nwfUdDrD612dOp')I recommend checking out the Spotipy library to learn about the other API calls you can make such as pausing, playing, changing volume, etc.
Combining the Spotify API and RFID Reader
Code to control Spotify using RFID Values
At this point, we have python code that reads an RFID value, and python code that uses the Spotify API to play music. We just have to combine these together to create the code for our music player.
- In your "rfidspotify" folder, create a file called player.py
- Copy and paste the code below
- Change the Device ID, Client ID, and Client Secret in lines 8-10 with your own values that you jotted down.
- In every if/elif block, replace the
RFID-CARDVALUEwith the ID of your RFID card/sticker that will play that song (you can use the read.py file we created earlier to determine what your cards' IDs are) - In the
sp.start_playback()function in every if/elif block, change the spotify track/album to the one you'd like to play when the card with that ID is scanned
A Note: The code below will infinitely loop and will restart if there are exceptions (errors). This is because if you try to scan a card to play a song after hours of not playing music on the device, it will become inactive and Spotify will return a "404 device not found" error. Once you go on Spotify from a phone/computer and connect to Raspotify again, the code will work. The code might also just time out, and if that's the case we want it to restart. Before it loops again, it will print the error message, so if the code isn't working for you, use this message during debugging to identify what your errors are. You can always use Ctrl C to stop the loop and exit the code.
python3 player.py
| #!/usr/bin/env python | |
| from mfrc522 import SimpleMFRC522 | |
| import RPi.GPIO as GPIO | |
| import spotipy | |
| from spotipy.oauth2 import SpotifyOAuth | |
| from time import sleep | |
| DEVICE_ID="YOUR_DEVICE_ID" | |
| CLIENT_ID="YOUR_CLIENT_ID" | |
| CLIENT_SECRET="YOUR_CLIENT_SECRET" | |
| while True: | |
| try: | |
| reader=SimpleMFRC522() | |
| sp = spotipy.Spotify(auth_manager=SpotifyOAuth(client_id=CLIENT_ID, | |
| client_secret=CLIENT_SECRET, | |
| redirect_uri="http://localhost:8080", | |
| scope="user-read-playback-state,user-modify-playback-state")) | |
| # create an infinite while loop that will always be waiting for a new scan | |
| while True: | |
| print("Waiting for record scan...") | |
| id= reader.read()[0] | |
| print("Card Value is:",id) | |
| sp.transfer_playback(device_id=DEVICE_ID, force_play=False) | |
| # DONT include the quotation marks around the card's ID value, just paste the number | |
| if (id=='RFID-CARDVALUE-1'): | |
| # playing a song | |
| sp.start_playback(device_id=DEVICE_ID, uris=['spotify:track:2vSLxBSZoK0eha4AuhZlXV']) | |
| sleep(2) | |
| elif (id=='RFID-CARDVALUE-2'): | |
| # playing an album | |
| sp.start_playback(device_id=DEVICE_ID, context_uri='spotify:album:0JGOiO34nwfUdDrD612dOp') | |
| sleep(2) | |
| # continue adding as many "elifs" for songs/albums that you want to play | |
| # if there is an error, skip it and try the code again (i.e. timeout issues, no active device error, etc) | |
| except Exception as e: | |
| print(e) | |
| pass | |
| finally: | |
| print("Cleaning up...") | |
| GPIO.cleanup() |
Executing the Code on startup of the Pi
Now, all that is left to do is make this python file play as soon as the Raspberry Pi boots up, so you don't have to manually run the program.
This great article walks you through how to add your file to the crontab and execute the script upon startup of the Raspberry Pi. I recommend testing the player.py code thoroughly before adding it to the crontab, to ensure you aren't running into any errors.
Instructables: Launch Python Script on Startup of Raspberry Pi
And now we're done!
- Turn on the pi
- Connect to raspotify on your phone or computer to make the Rasperry Pi an active Spotify device
- Scan a card and play music!
If you don't use the record player for a few hours and scanning cards isn't working, make sure to connect to Raspotify again on Spotify through a phone or computer.
Finishing Touches
Finally after the code was working, I printed mini-vinyl covers on cardstock, and 3D printed vinyls to attach the RFID stickers and insert into the covers. I also 3D printed some parts to mount the scanner and Raspberry Pi into the wooden box.
And that's all!